Build a Blog Community by Creating a Facebook Like Box
9Some bloggers do want to restrict their blog to private members, friends and family which can be done by restricting the access of the search engines and marking the blog private access only, so the blog community in this case becomes more of a private club than a public house.
For the vast majority of us however we are looking for a wider audience and are reaching out to find people who can possibly become friends who share a common interest, loyal customers who wish to purchase products or services or are simply interested in the information you are providing, whatever category they fit into there is normally a need to interact with you and share what they find with other people.
It makes sense then to make these objectives relatively easy to achieve, most people when they visit a blog want to process their interaction swiftly i.e. they want to spend their time communicating, gathering information or making a purchase without struggling to find the functionality that allows them to do that. Some of the things your average site visitor wants to do: –
- Find a subject of interest to read if they happen upon your blog casually – clear navigation
- Find the information, product or service they are looking for if they came to you for a specific purpose – clear navigation
- To easily post a comment or ask a question – comment boxes
- Mark the site for future reference, assuming they found what they want – social bookmarking icons
- Follow the blog or have updates delivered via email – RSS Feeds
- Subscribe to the blog so that they are kept informed when updates are made – site registration tools
There will be more and the comments box awaits if you feel there are other important factors that need to be included so please have your say.
 The beauty of the most popular blogging platforms is that they have recognised all these needs and provide the tools that allow you to meet these requirements in a professional and easily applied manner, but it is up to the webmaster to utilise these tools and put them in place.
One of these tools is ‘A Facebook Like Box’ , this is a device that easily gives people who want to follow your blog an option for liking and sharing your blog with their friends. If they are already registered with ‘Facebook’ then literally all they need to do click on the ‘page badge’, it comes as a standard gadget for Facebook pages so is very easy to add into your blog when using that platform.
As I already have a Facebook pages for several of my blogs I decided creating a facebook like box would be a good idea and I could utilize the badge on my other blogs that use the ‘WordPress’ platform.
Creating a Facebook Like Box for my WordPress Blog
To add a page badge to your site or individual posts, all you need to do is go to your home profile page and click on the little down arrow next to your Activity Log (see image) then select ‘Add a badge to your site’ from the menu options.
![]()
That will take you to a page for creating a facebook like box or badge as they call it, select the type of badge you want from several options. For a page you will clearly need to select the ‘Page Badges’ option. If you have several pages you will be presented with a list of badges that you can custom configure to your requirements.
When you select the platform you are going to add it to, you will be presented with some code that you can copy into your blog to show the badge on your own site. I Chose ‘Other’ in this instance.
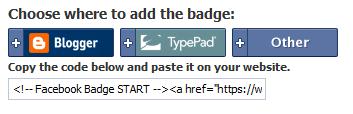
The badge, as shown below, can then be clicked on to take your visitor to your Facebook page where they can like the page and contribute via comments, liking other comments etc. Any activity they engage in will also be shared with their Facebook friends via their newsfeed (subject to their settings).

This is just one example of making it easy to build a blog community, there are several others including creating pages on LinkedIn, Google+ and having an account on Twitter. You will need to decide which works best for you and focus on that option. Creating a facebook like box is one of the easiest options you have and Facebook has a massive amount of members so it should be one of your primary considerations.
Google Connect would be great – if the blanking thing actually worked on Blogger blogs. Hundreds of bloggers have this issue, same goes for the Followers gadget offered by Blogger. These two items used to work just fine until a couple of months ago, something changed, now they don’t work. So disgusted Google can’t get its act together I deleted both of them on all my blogs. When I posted to all 12 blogs about the issue, suddenly one person showed up to try and resolve the issue – still no word. I don’t know what’s going on but I figure there are other options I can offer fellow bloggers when they show up at one of my blogs.
.-= Denny Lyon´s last blog ..Funny Video: Rapping Swine Flu Doc =-.
Have to admit Denny, you have a point it does seem to be down a lot recently. But I am the eternal optimist I actually think a company like Google will sort it out. Something else they should sort out while they are at it, is showing site page ranks on Google Chrome, might make it just worth using then for a serious blooger. Just my mini-rant.
great stuff.. beautiful
thanks for the tutorial, it was easy to follow and i have it up and running now 🙂
.-= digitaldoodlebug´s last blog ..Selling online- start with a camera =-.
Ich habe den Blog auf Yahoo gefunden. Gute Arbeit! Ich habe ihn zu meinem Google-News Reader hinzugef
Hi Brian,
I was able to start a google friend account, and followed your instructions as well as google’s. Seem to have a block to getting the code onto the site, and will see if I can get some help with that part tomorrow. I am still a work in progress! Great blog you have here!
Judy
.-= Judy Smith´s last blog ..Into Every Life A Little Rain Must Fall =-.
Came clueless, left worried. Thanks for the post. – Bisexuality immediately doubles your chances for a date on Saturday night. – Woody Allen Born 1935
yes a good time is a blog time.
Google removed the option for using Friend Connect on blogging platforms other than Blogspot, so if you are a bit puzzled by the comments. It was changed to Facebook Badges as the principle is much the same and that is still an option. Google have re-focussed there social connections options on Google+ and away from Friend Connect.